Hot Posts

2014/09/01

Lawnmover Motor is Controlled Remotely

Question from customer:
I’m looking for an RC transmitter and receiver to operate the 4″ actuator a distance of 200ft for steering a lawnmower. Any suggestions?
700-590742
Answer:
We recommend the model of 500m/1500ft RF motor controller (S1FC-DC09/12/24 & CV-4-2). The controller is activated by DC 9V, 12V and 24V. It is usually for motors of rolling blinds, doors, projection screens, awnings, pumps, winches, conveyor or other appliances and mechanicals. It features in forward-reverse-stop capability which can make motor rotate in positive or reversal direction. With maximum transmission distance of 500m/1500ft, it can satisfy your requirement. Inner circuit of this kit uses the RF technology for making a wireless remote, which can make motor controlled by transmitter from any places with in reliable distance, this configured wireless signal can pass through walls, doors or floors or other solid obstacles.
1_13_1
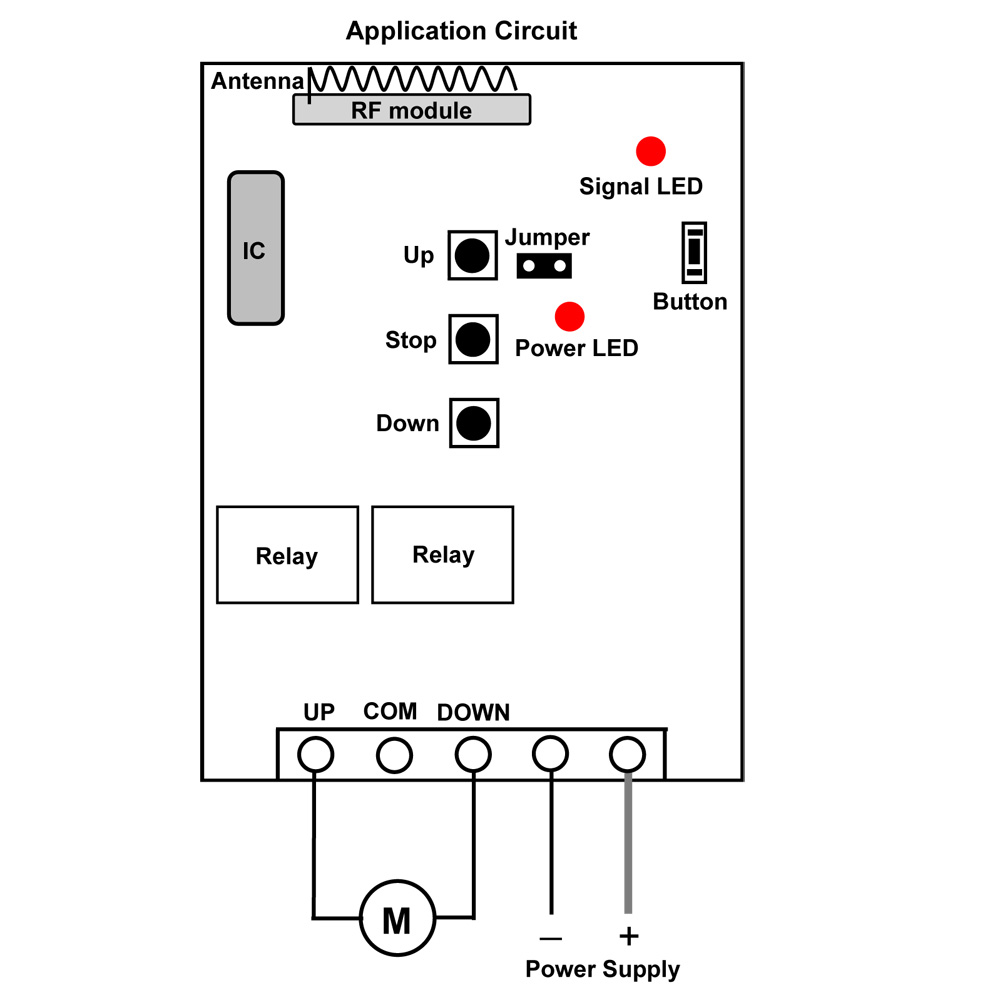
Here is the wiring.
At first, we connect power line to terminals “+” and “-”. Secondly, we connect the receiver to the lawnmower actuator motor. Lawnmower actuator motor is wired to UP and DOWN terminals of receiver. At last, we add power supply to receiver. You can exchange “UP” and “DOWN” lines of the motor to change rotating direction of the motor.
1_06
There two working modes in it.
Set Momentary control mode: Do not connect Jumper.
Press and hold button ▲ on remote or receiver: Terminals UP and DOWN output + DC9V / DC12V / 24V (UP: +, DOWN: -), lawnmower actuator motor rotates continuously in positive direction.
Release button ▲ on remote or receiver: Stop the motor.
Press and hold button ▼ on remote or receiver: Terminals UP and DOWN output - DC9V / DC12V / 24V (UP: -, DOWN: +), lawnmower actuator motor rotates continuously in reversal direction.
Release button ▼ on remote or receiver: Stop the motor.

Set Latching control mode: connect the Jumper.
Press button ▲ on remote or receiver: Terminals UP and DOWN output + DC9V / DC12V / 24V (1: +, 2: -), lawnmower actuator motor rotates continuously in positive direction.
Press ■ on remote or receiver: Stop the motor.
Press button ▼ on remote or receiver: Terminals UP and DOWN output - DC9V / DC12V / 24V (1: -, 2: +), lawnmower actuator motor rotates continuously in reversal direction.
Press button ■ on remote or receiver: Stop the motor.

2014/08/20

2 Channel Power Outage Memory Function Remote Controller

We recommend this 2 channel power-off memory function remote controller (S2MU-DC06/09/12/24 & C-2). It can work in 4 kinds of voltage, 6V, 9V, 12V and 24V. There 4 working modes in it. You can switch as you want through connection or disconnection of jumpers. It controls lights, motors, fans, electrically operated doors / locks / windows / blinds / cars or other appliances with voltage AC110~240V or DC0~28V. It is great for hard to reach lights or other DC/AC electrical devices. The working transmission is about 100m in the open field. With function of memory, if the power is cut off, the relay will return automatically to the previous status after the power is restored.
remote controller
We’d like to show the wiring and controlling of ac, dc lamps.
The contact of relay of each receiver is normally open/ closed. So you need to wire ac lamp or dc lamp to normally open contact B&C and supply AC 220V power or dc power to lamp.
inner circuit
wiring diagram

Usage:
Setting control mode Toggle: Only connect Jumper-2.
Control mode Toggle: Press -> On; Press again -> Off.
Setting control mode Momentary: Only connect Jumper-1.
Control mode Momentary: Press and hold -> On; Release -> Off.

Setting control mode Latched: Do not connect Jumper-1 and Jumper-2.
Control mode Latched: Press -> On, another relay Off; Press another button -> Off.

Setting control mode Momentary + Toggle: Connect Jumper-1 and Jumper-2.
Control mode Momentary (Channel 1): Press -> On; Press again -> Off.
Control mode Toggle (Channel 2): Press and hold -> On; Release -> Off.

2014/08/12

How to Remote Control 4 Lamps from Different Places

One of our customers wants a simple wireless remote operate 4 led lamps from several room at his house. He needs 4 transmitters and a receiver which can be mounted in a designated place. The remote must work from receiver about 50m away and not line of sight through doors and walls.
We suggest him choose dc 4 channel remote control system (S4C-DC12& 4C-1). Maximum working current is 5amp each relay. Working distance of remote and receiver set is about 100m (300ft) in open field. This 4CH 6V9V/12V/24V wireless remote switch operates in toggle, momentary, latched, toggle + momentary control mode (set the mode as you like freely). Easy to install and operate. Just press slightly the button on the remote, you can control universal DC/AC electrical devices. The RF signal can pass through walls, doors and other barriers. As he said, we will set 4 transmitters and this receiver with same 8-bits code in advance so that they can work together.
remote controller
Operation modes:
  • 1) Setting control mode Latched: Disconnect Jumper-1 and Jumper-2.
Control mode Latched (Relay 1~4): Press -> On, other relays Off; Press other button -> Off.
  • 2) Setting control mode Momentary: Only connect Jumper-1.
Control mode Momentary (Relay 1~4): Press and hold -> On; Release -> Off.
  • 3) Setting control mode Toggle: Only connect Jumper-2.
Control mode Toggle (Relay 1~4): Press -> On; Press again -> Off.
  • 4) Setting control mode Momentary + Toggle: Connect Jumper-1 and Jumper-2.
Control mode Momentary (Relay 1, 2): Press and hold -> On; Release -> Off.
Control mode Toggle (Relay 3, 4): Press -> On; Press again -> Off.
We will show you how to remote control 4 led lamps from different places.

2014/07/31

Wireless Controller Switch DC Lamp Off/On and Make Motor Run in Positive and Reverse Rotation

We are about to recommend remote controller which is applied to both motor and lamp. It is DC12V momentary &toggle remote controller (S1F-DC12 & C-3-2), which features in motor forward-reverse capability. You can rotate the motor in positive or reversal direction by transmitter from any place within a reliable distance, wireless signal pass through walls, floors and doors. It is suitable for the motors of rolling blinds / doors, projection screens, awnings, pumps, winches, conveyors or other appliances and mechanicals with voltage DC12V. We also design lamp controlling function so that you can control motor and lamp with the same transmitter.


2014/07/22

Wireless Wall Switch and AC Receiver Remote Control Home Lamp

We made a remote control kit which consists of a wall-mounted switch and a remote receiver (S1X-AC220&HR-1).
wall-mounted switch and receiver
When we use ordinary switch to switch home appliances off and on, we should do some wiring for home appliances, some time it is very complicated and time- consuming. Our RF wireless wall mounted switch looks like universal switch from appearance, but it is wireless and operate by RF signal that can pass through walls, floors and doors. It is can be simply affix to any place you want by double faced adhesive tape.
wall-mounted switch
Through RF signal, you don’t have to wire between switch and appliances. Wall-mounted switch works with remote receiver to remote control ac lamp.
Here is the wiring diagram.
wiring diagram
Wire ac lamp to OUTPUT of receiver. And add power supply to receiver. This kind of receiver is designed for AC output terminals so that lamp can get power from output terminals of receiver directly.
Setting different control modes (We usually set toggle for lamp controlling.)
Setting control mode Toggle: Only connect Jumper-2.
Press button: Turn on the relay, terminal OUT outputs AC power, turn on lamp.
Press button again: Turn off the relay, terminal OUT no output, turn off lamp.

2014/07/02

Wireless Motor Controller for Linear Actuator Motor

“I need a linear actuator to hook to my home automation. I control my large saltwater tank via this system. I want to achieve:
Small actuator on cabinet door
When I turn an outlet on that it’s plugged into actuator opens
Ability to turn outlet off and actuator closes”
saltwater tank
Answer: 
“You can use our controller- low current triggered transmitter (CB-2V) and forward-reverse-stop receiver (S1FC-DC12). The transmitter is low-current triggered. When input DC power 5~28V, the transmitter is triggered and then transmits an rf signal “ON”. When stop inputting DC power, the transmitter is triggered and then transmits an rf signal “OFF”. This DC RF motor remote control features in forward-reverse-stop capability. You can rotate the motor in positive or reversal direction by transmitter from any place within a reliable distance, wireless signal pass through walls, floors and doors. It is suitable for the motors of rolling blinds / doors, projection screens, awnings, pumps, winches, conveyors or other appliances and mechanicals. Remote distance is up to 500M.
remote-control-our-automation
Firstly, we connect transmitter to a 12V power adapter and plug to adapter the outlet, and secondly, connect the receiver to the linear actuator motor. Linear actuator motor is wired to UP and DOWN terminals of receiver. Finally, add power supply to receiver.
1_06
When you turn the outlet on, the transmitter sends a signal “ON” to the receiver, then actuator shaft extends.
When you turn the outlet off, the transmitter sends a signal “OFF” to the receiver, then actuator shaft retracts.”

2014/06/30

One to Many Series-One Transmitter Remote Control 4 Devices

Question from customer:
“I need to operate 3 or 4 devices separately with 2 momentary functions per each. I need one transmitter to function from approx. 100 – 500m – to work all devices. The devices will operate on a 12volt DC system.”
Answer: 
We recommend the 2 channel 2000m wireless momentary receiver (S2M-DC12-ANT2) with external antenna, and the long rang transmitter (CB-2). It can control lights, motors, fans, electrically operated doors/locks/windows/blinds/cars or other appliances with AC110~240V or DC0~28V. You can turn on/off the receiver with transmitter (remote control) from any place within a reliable distance; the wireless RF signal can pass through walls, floors and doors. It is momentary mode (Press and hold→On; Release→Off). External Extended antenna, its transmitting can reach about 2000m.
remote controller-our automationAntenna wire-our automation
You can wire 4 devices to each relay of two receivers respectively. Two receivers and this transmitter will be set the same code. This receiver is NO/NC contact. Wire device to B terminals to each relay. And supply power to receiver your device respectively.
wiring diagram
1) Press and hold big button: Turn on relays on the first receiver (connect B and C, disconnect A and B)
2) Release big button: Turn off relays on the first receiver (disconnect B and C, connect A and B)
3) Press and small button: Turn on relays on the second receiver (connect B and C, disconnect A and B)
4) Release small button: Turn off relays on the second receiver (disconnect B and C, connect A and B)

2014/06/25

Wireless Remote Control Electric Door Locks

Question from customer:
I need one transmitter and 2 receivers that the transmitter operates separately. Preferably 12 volt receivers will work out to 300 yards. I am using the receivers to operate door locks on a project I’m working on.
Answer:
We recommend you 2000m remote control system input & output 12V (S1X-DC12-ANT2&CB-2). One transmitter (CB-2) can pair up with 2 receivers (S1X-DC12-ANT12), so you can use one transmitter remote control two receivers. With external extend antenna, its transmitting distance can reach about 2000m (2187yards) in the open field. It is 12volt actuated, that is to say, electric door lock doesn’t need to be supplied additional power supply because electric door lock will get power from powered receiver.
remote control kit-ourautomtion
Wiring is simply easy. Wire your electric door lock to A&B terminals of receiver.
wiring-diagram-ourautomation
Operation:
Setting control mode Latched: Do not connect Jumper-1 and Jumper-2.
Press big button: Turn on the relay, terminal A&B output DC power, open the door.
Press small button: Turn off the relay, terminal A&B no output, close the door.

2014/06/23

Four Transmitter and One Receiver-One to Many Series

Question from customer:
I need a unit that can receive from four transmitters, and switch 4 relays. Each transmitter controls each channel.
Answer:
We recommend the model of 4 Transmitters and 1 Receiver Kit (S4C-DC12 & 4C-1), which belongs to “One-to-many series”. “On-to-many series” include one-transmitter-to-many-receiver system and one-receiver-to-many-transmitter system. It is often used for controlling two or more electrical devices in different places by one transmitter; or one electrical device by two or more transmitters.
If you want to remote control one device with different transmitter from different places, this kit is your better choice.
our automation-remote control kit
Here is the wiring diagram for your reference.
The receiver is normally open & closed contact. A,B terminals are normally closed. B,C terminals are normally open. So you can wire your devices to B terminals and negative terminal of power supply. And add DC 0-28V or AC 110-240V to your devices. Supply DC 12V to receiver.
our automation-wiring diagram
Its transmitting distance is about 100m (in the open field). You can set different working modes according to your need.
1) Setting control mode Latched: Disconnect Jumper-1 and Jumper-2.
Control mode Latched (Relay 1~4):
Press transmitter 1, light 1 ->On; other lights Off;
Press transmitter 2, light 2 ->On; other lights Off;

2) Setting control mode Momentary: Only connect Jumper-1.
Control mode Momentary (Relay 1~4):
Press and hold button of any transmitter-> light is on;
Release button -> light is off.

3) Setting control mode Toggle: Only connect Jumper-2.
Control mode Toggle (Relay 1~4): Press button of any transmitter -> light is on;
Press button of any transmitter again -> light is off.

4) Setting control mode Momentary + Toggle: Connect Jumper-1 and Jumper-2.
Control mode Momentary (Relay 1, 2):
Press and hold buttons of transmitter 1 or 2 -> light 1 or light 2 is on;
Release buttons of transmitter 1 or 2 -> light 1 or light 2 is off.

Control mode Toggle (Relay 3, 4):
Press buttons of transmitter 3 or 4-> light 3 or light 4 is on;
Press buttons of transmitter 3 or 4 again -> light 3 or light 4 is off.

2014/06/20

How to Build Communication between Karaoke Rooms and Reception Desk

Question from customer:
I want to run business of karaoke rooms. So I need a set to be installed in karaoke rooms and reception desk. It is better to install calling gadget to karaoke room and receiver to reception desk. When there is customer in karaoke room calling, he can using calling gadget to call our stall to help him. Do you have any suggestion?
Answer:
We recommend wireless calling system to you. It includes calling transmitter and receiver host. You can pair up any kinds of calling transmitter with receiver host according to your need. The receiver host is 999-channel, so you can pair up 999 transmitters with a 999-channel receiver host at most. This kit is multi-mode. It is better to choose “Normal mode”. You can choose 200m 2 buttons free sticker wireless calling button and a 999- channel receiver host and stick calling button on the wall of karaoke room.
Here we can show you this controlling project procedure.
 

2014/06/18

Wireless Calling System (Hospital Mode)

Question from customer:
I manage a small new hospital. Now I want a remote control system which includes six remote transmitters and one 6-channel receiver. Each remote controller is put on every desk beside bed. And the receiver is put in the nurse station. When there is patient calling, he can press the button to notify the nurse station in time.
Answer:
We recommend wireless calling system. They include a 999-channel receiver host and more than one transmitter at your option. You can choose six calling buttons That is to say, you can pair up 999 transmitters with a 999-channel receiver host at most. This kit is multi-mode. We’d like to make a presentation of hospital mode.

2014/05/15

AC 220V Output Remote Controller for Electric Shutter

Overview:
I want to buy a radio system for my 9 shutters (220 V), wireless control, 9 receivers and 1 remote, climb or descend in all my components by one remote.
electric shutter 2
Solution:
We recommend ac power output controller (S1FM-AC220), which is designed for controlling motor specially. It can remote control many kinds of motor, rolling blinds/ doors, projection screens, awnings, winches, conveyors… 10amps is its maximum current. And when it works with the long distance transmitter (CB-2), the whole kit’s transmitting distance will reach 1000m.
remote-control-kit
Connect live wire to terminal “L” and neutral wire to terminal “N”. Then connect AC motor to terminals “UP”, “COMMON” and “DOWN”. You can exchange “UP” and “DOWN” wires of motor to change rotating direction of motor. 9 shutter motors should be wired to 9 receivers respectively. 9 receivers will be programmed the same code so that they can work together with one remote.
1_06
There is only one working mode in this controller. It is inversion control mode(Press and hold big button→positive rotation; press and hold small button→reversal rotation )
Press and hold big button, terminals UP and COMMON directly output AC 220; 9 shutter motors rotate continuously in positive direction at the same time.
Release big button, stop 9 shutter motors simultaneously.
Press and hold small button, terminals DOWN and COMMON directly output AC 220; 9 shutter motors rotate continuously in reverse direction at the same time.
Release small button, stop 9 shutter motors simultaneously.

2014/05/09

Run RC Motor Forward and Backward Wirelessly

Overview:
My plan is to be able to remotely control an RC motor forward and backward wirelessly with the remote. I was thinking one receiver and one remote, but which products would I be able to do this with.
Solution:
We recommend the model of DC power motor controller (S1FC-DC12&CV-4-2) to you. This DC RF motor remote control features in forward-reverse-stop capability. You can rotate the motor in positive or reversal direction by transmitter from any place within a reliable distance, wireless signal pass through walls, floors and doors. It is suitable for any RC motors of rolling blinds / doors, projection screens, awnings, pumps, winches, conveyors or other appliances and mechanicals. The kit’s transmitting distance is up to 500M.
remote control kit
Connect power wire to terminals “+” and “-”. Connect DC radio-controlled motor to terminals “UP” and “DOWN”. You can exchange “UP” and “DOWN” wires of the motor to change rotating direction of the motor.
wiring diagram
Set Momentary control mode: Do not connect Jumper.
Press and hold button ▲ on transmitter or receiver: Terminals UP and DOWN output +DC12V (UP:+, DOWN:—), RC motor rotates continuously in positive direction.
Release button ▲ on transmitter or receiver: Stop the RC motor.
Press and hold button ▼ on transmitter or receiver: Terminals UP and DOWN output +DC12V (UP:—, DOWN:+), RC  motor rotates continuously in reverse direction.
Release button ▼ on transmitter or receiver: Stop the RC motor.
Set Latched control mode: connect Jumper.
Press button ▲ on transmitter or receiver: Terminals UP and DOWN output +DC12V (UP:+, DOWN:—), RC motor rotates continuously in positive direction.
Press button ■ on transmitter or receiver: Stop the RC motor.
Press button ▼ on transmitter or receiver: Terminals UP and DOWN output +DC12V (UP:—, DOWN:+), RC motor rotates continuously in reverse direction.
Press button ■ on transmitter or receiver: Stop the RC motor.

2014/04/30

2000m Momentary Controller for DC Motor

Question from customer:
I am looking for a radio transmitter receiver 1 channel, 24V, 500 to 1000m, and function: I support the button, close the relay; I loose the button, open the relay.


Answer:


We recommend the model of 1 channel Momentary 2000m remote control kit (S1M-DC24-ANT2& CB-1). Remote control kit with momentary mode is often used to control motor open/close for electrically operated door/lock/window/blind. Press and hold the button on transmitter, start the motor (close the relay); release the button, stop the motor(open the relay). With external extend antenna, its working distance can reach 2000m (6000ft) theoretically. We have three standard voltage: 9V, 12V, 24V. You can choose the 24V. Owing to one relay on the receiver, it won’t realize that DC motor runs in forward and reverse. It only switches off/ on DC motor.


And it is normally open and close relay contact, generally speaking, you should add additional power supply to controlled DC motor. Or you can use one power supply for receiver and DC motor at the same time. The wiring method is as follow.


Connect DC motor to B&C terminals. And wire motor to positive and negative terminals of battery. Wire positive and negative terminals of receiver to battery.


Operation is very easy.


Press and hold button, turn on motor.


Release button, turn off motor.

2014/04/16

How to Remote Control 5 Lamps Individually

Question from Customer:
I am looking for 5 remote controls to control 5 individual lights in living room. Do you have any recommendations?
1CH 220V Power Output Remote Controller Sets Switch 5 Pendant Lights Off and On Individually
Answer:
We recommend the model of 1 channel 220V power output controller switch (S1X-AC220+2C-2), you can buy 5 sets.
It can control lights, motors, fans, electrically operated doors/locks/windows/blinds/cars or other appliances with AC 100~240V. You can turn on/off the receiver with transmitter (remote control) from any place within a reliable distance (about 100m); the wireless RF signal can pass through walls, floors and doors. With characteristics of direct power output, you don’t have to provide additional power to remote-controlled device since device can get power from receiver if receiver is charged.
1CH 220V Power Output Remote Controller Sets Switch 5 Pendant Lights Off and On Individually
Wiring diagram is here. Wire light to L&N terminals of “OUT “terminal. Each light will wired to each receiver.
There are three working modes in it. They are toggle, momentary and latched modes. Here, you can choose latched because there are two buttons of transmitter.
Setting control mode Latched: Do not connect Jumper-1 and Jumper-2.
Press button 1: Turn on light.
Press button 2: Turn off light.
You can switch off/ on any light at your option.
1CH 220V Power Output Remote Controller Sets Switch 5 Pendant Lights Off and On Individually