Hot Posts

2013/04/19

One transmitter and 6 receivers remote control 6 lights in football field

My uncle is a football field administrator,who is looking for to remote control his 6 lights in the football field because he doesn’t want to switch the manual switches one by one in the control room. He really needs a set of rf long-range remote control system.
He wants to control 6 lights in the football field simultaneously like the following picture:


He asked a remote control system supplier whether there was some kinds of remote control products. The supplier offered this kind of product.


Each receiver has antenna so that it can receive the signal far away from the transmitter. The distance is about 1000m in an open ground. So it is quite favorable for football field.

According to his requirement, the supplier prepared 6 receivers to connected 6 lights separately.


Then the supplier showed him the wiring method and picture.
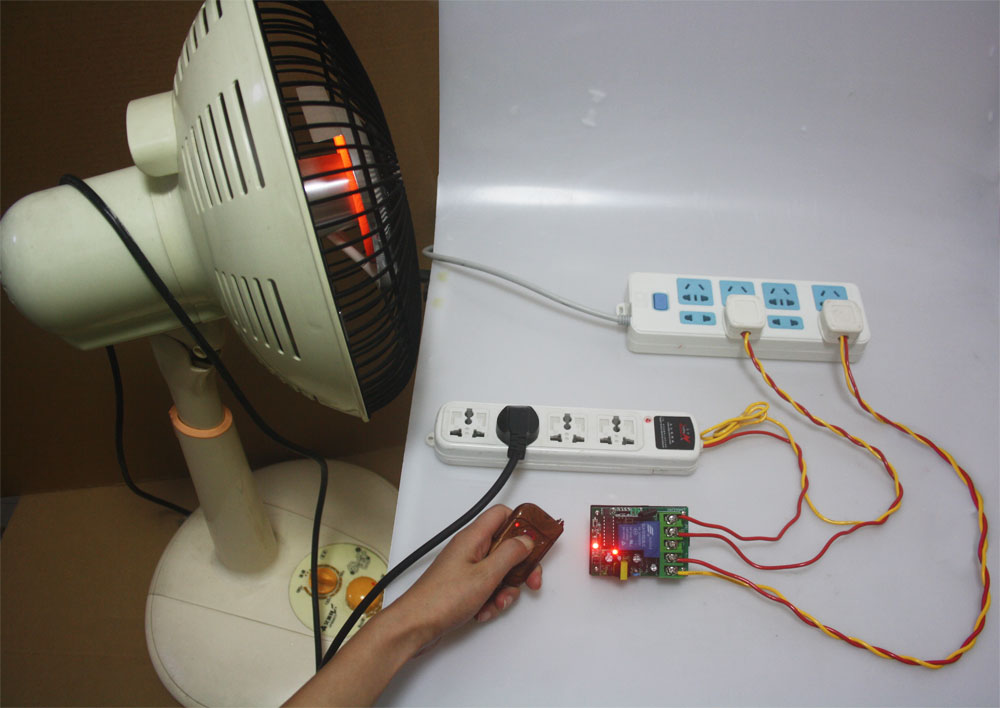
Wires from the light should be connected to A&B terminals of receiver. 12 DC power should power to the receiver.


He was told the usage of remote control kit.
Pressing the big button, 6 lights are turned on.
Pressing the small button, 6 lights are turned off.
After using this kind of remote controller, he will control those 6 lights in this football field at ease at night.

2013/04/18

1 Channel Toggle Remote Control an 2400 Watts Electric Heater

A few day ago, I came up with a good idea when I stared at my electric heater. Why didn't I use remote controller to operate this 2400 watts electric heater? So I try to do what I think. I bought a remote controller with toggle mode on the internet . That is a high power remote control kit.

Let me show you how they work.
First, wire a power strip to the receiver and power supply. I used a power strip because I don't want to damage the plug and wires of the heater. (See the following picture)
Second, the receiver is powered by power supply.
Third, plug the electric heater to that power strip.
Pressing the button, the electric heater is turned on.


Pressing the button again, the electric heater is turned off. 


DIY Wireless Remote Control Car LED Tail Lamp

Supposing we have to refit our car or truck for our needs sometimes. Or some items, such as lamps,loudspeakers,will be moved to another position from original position. 

Certainly, the rewiring become difficult and inconvenient. Is there any other methods to make this wiring easier? Can we try to change to wireless remote control items in car? 
So we decide to simulate wireless remote control LED tail lamp in the car.

In the beginning, we will prepare the following items:
1x LED lamp
1x manual switch
Power supply

We would like to simulate the operation of LED lamp in the car initially. LED lamp should be connected to power supply and a manual switch.


Usually, we switch the manual switch to turn the light on and off just like we control the tail lamp in the car.


Now, we start to operate how to wirelessly remote control LED lamp. First, the transmitter is supposed to be connected to power supply and that manual switch.


Second, LED light should be connected to receiver.


Third, we switch on the manual switch and the transmitter will send an “ON” signal to the receiver. The receiver receives the signal to instruct the light to turn on.


Fourth, we switch off the manual switch and the transmitter will send an “OFF” signal to the receiver. The receiver receives the signal to instruct the light to turn off.


2013/04/15

How to control the loudspeaker plugged into a car on and off by rf remote controller

My dad would like to plug a loudspeaker into the trunk of his car and wanted to control it by remote controller. He was wondering if it could come true because he wanted to use loudspeaker to listen to music when he went out for picnic with us. He just searched from the internet, then he chose Model 0020003(S1L-DC12 & C-2) from one remote control supplier.


It is the wiring procedure which the supplier shows to him. The red wire from the loudspeaker is connected to the C terminal of the receiver and black wire from the loudspeaker is connected to the negative electrode of the power supply. The positive wire of the supply power is connected to B terminal and positive electrode of the receiver. The negative electrode of the power supply of power supply and receiver are connected together.
When we press the button1, the loudspeaker turn on; when we press the button 2, the loudspeaker turn off.

How does the mercury switch remote control the garbage bin

I  have a mercury switch and I  intends to apply to my garbage bin. So when the truck tips garbage bin, I can know it in time. Now I am looking for a remote control kit which can connect to mercury switch to attach that garbage bin. When the garbage bin is tipped by the truck, the mercury switch is on and triggers the remote controller to turn on the light in the house. So I select this control kit which are model 0020259 S1DA-AC220 & model 0021000 C-1. S1DA-AC220 is a receiver with a timer. C-1 is the transmitter.

First, the mercury switch is supposed to be soldered to those two terminals of button.(see the following picture)


Second, this unit should be attached to the garbage bin.
Third, the power supply should be connected to the N&L terminal of the receiver.
Wires from the light should be connected to B&N terminal of the receiver. Then we use another wire connect to C&L terminal of the receiver.


We press buttons of “+” and “-” on the timer to adjust delay time. I set 5 minutes for this timer.
When the truck comes and picks up the garbage bin, the garbage bin will be turned upside down so that the mercury will roll to another side. With connection of two wires at another side through mercury, the transmitter will send signal to receiver. After the receiver receives the signal, the light will shine and last for 5 minutes. Then the light will turn off automatically after 5 minutes. With shining of light, we know that the garbage truck tips garbage into truck and takes away. 

2013/04/11

1 Remote Transmitters & 6 RF Receiver used for opening or closing 6 awnings


My aunt manages a sidewalk cafe. When the dazzling and hot sun shining or drizzling day and shower coming, awnings should be opened for her customers. So she needs a remote controller to control those 6 awnings without going everywhere.


She selected this remote control kit.

She wants this kit to be like this:


She said to me that each of the receivers should learn code from the transmitter so that every two buttons on the transmitter can control each receiver.


Each motor of the awning should be connected to the receiver one by one. Every receiver should be connected to the power supply.

When she presses button 1, with the motors of awning 1 working continuously in “UP” direction, awning 1 goes up slowly. Release button 1, the motor stops. Press button 2, the motors of awning 1 goes to “Down” direction. When pressing and releasing button 3& button 4, we can control awning 2…When pressing and releasing button 11&button 12, she can control awning 6. My aunt is very satisfied with those remote control kit.


2013/04/10

How do you know when the truck tips your garbage bin outdoor with RF vibration detector

I just want to use wireless remote controller to attach his garbage bin outside. When the truck picks up the bin and tips garbage, the controller will detects and turns up a light in the house. So I can know that the garbage is taken away. It sounds a very innovative idea. I have no idea to realize it?So I searched on the internet and asked a remote control supplier, they select a remote control kit for me. That is model 0020259 & model 0010032 (S1DA-AC220 & W-12). They are the remote control kit with functions of vibration reminder and time delay.
They told me that W-12 is an RF vibration detector. When the item is vibrated, the vibration detector will be triggered and will send signal to the receiver to instruct the device to work. S1DA-AC220 is a receiver with a timer.

It looks like great.
With the procedure they shown,  I stick the detector to the garbage bin and pull out the antenna. (To see the following picture)


Then I begin to wire. The power supply should be connected to the N&L terminal of the receiver. Wires from the light should be connected to B&N terminal of the receiver. Then I  use another wire connect to C&L terminal of the receiver. (Wire as the wiring picture they show me)


The operation time came,  I press buttons of “” and “” on the timer to adjust delay time. I set 5 minutes for this timer.
When the truck comes and picks up the garbage bin, the garbage bin is vibrated so that the vibration detector is triggered and the light will shine and last for 5 minutes. Then the light will turn off automatically after 5 minutes. With shining of light, I know that the garbage truck tips garbage into truck and takes away. I like this little , useful, handy gadget.