2014/05/15
AC 220V Output Remote Controller for Electric Shutter
Overview:
I want to buy a radio system for my 9 shutters (220 V), wireless control, 9 receivers and 1 remote, climb or descend in all my components by one remote.

Solution:
We recommend ac power output controller (S1FM-AC220), which is designed for controlling motor specially. It can remote control many kinds of motor, rolling blinds/ doors, projection screens, awnings, winches, conveyors… 10amps is its maximum current. And when it works with the long distance transmitter (CB-2), the whole kit’s transmitting distance will reach 1000m.

Connect live wire to terminal “L” and neutral wire to terminal “N”. Then connect AC motor to terminals “UP”, “COMMON” and “DOWN”. You can exchange “UP” and “DOWN” wires of motor to change rotating direction of motor. 9 shutter motors should be wired to 9 receivers respectively. 9 receivers will be programmed the same code so that they can work together with one remote.

There is only one working mode in this controller. It is inversion control mode(Press and hold big button→positive rotation; press and hold small button→reversal rotation )
Press and hold big button, terminals UP and COMMON directly output AC 220; 9 shutter motors rotate continuously in positive direction at the same time.
Release big button, stop 9 shutter motors simultaneously.
Press and hold small button, terminals DOWN and COMMON directly output AC 220; 9 shutter motors rotate continuously in reverse direction at the same time.
Release small button, stop 9 shutter motors simultaneously.
2014/05/09
Run RC Motor Forward and Backward Wirelessly
Overview:
My plan is to be able to remotely control an RC motor forward and backward wirelessly with the remote. I was thinking one receiver and one remote, but which products would I be able to do this with.
Solution:
We recommend the model of DC power motor controller (S1FC-DC12&CV-4-2) to you. This DC RF motor remote control features in forward-reverse-stop capability. You can rotate the motor in positive or reversal direction by transmitter from any place within a reliable distance, wireless signal pass through walls, floors and doors. It is suitable for any RC motors of rolling blinds / doors, projection screens, awnings, pumps, winches, conveyors or other appliances and mechanicals. The kit’s transmitting distance is up to 500M.

Connect power wire to terminals “+” and “-”. Connect DC radio-controlled motor to terminals “UP” and “DOWN”. You can exchange “UP” and “DOWN” wires of the motor to change rotating direction of the motor.

Set Momentary control mode: Do not connect Jumper.
Press and hold button ▲ on transmitter or receiver: Terminals UP and DOWN output +DC12V (UP:+, DOWN:—), RC motor rotates continuously in positive direction.
Release button ▲ on transmitter or receiver: Stop the RC motor.
Press and hold button ▼ on transmitter or receiver: Terminals UP and DOWN output +DC12V (UP:—, DOWN:+), RC motor rotates continuously in reverse direction.
Release button ▼ on transmitter or receiver: Stop the RC motor.
Set Latched control mode: connect Jumper.
Press button ▲ on transmitter or receiver: Terminals UP and DOWN output +DC12V (UP:+, DOWN:—), RC motor rotates continuously in positive direction.
Press button ■ on transmitter or receiver: Stop the RC motor.
Press button ▼ on transmitter or receiver: Terminals UP and DOWN output +DC12V (UP:—, DOWN:+), RC motor rotates continuously in reverse direction.
Press button ■ on transmitter or receiver: Stop the RC motor.
2014/04/30
2000m Momentary Controller for DC Motor
Question from customer:


I am looking for a radio transmitter receiver 1 channel, 24V, 500 to 1000m, and function: I support the button, close the relay; I loose the button, open the relay.
Answer:
We recommend the model of 1 channel Momentary 2000m remote control kit (S1M-DC24-ANT2& CB-1). Remote control kit with momentary mode is often used to control motor open/close for electrically operated door/lock/window/blind. Press and hold the button on transmitter, start the motor (close the relay); release the button, stop the motor(open the relay). With external extend antenna, its working distance can reach 2000m (6000ft) theoretically. We have three standard voltage: 9V, 12V, 24V. You can choose the 24V. Owing to one relay on the receiver, it won’t realize that DC motor runs in forward and reverse. It only switches off/ on DC motor.
And it is normally open and close relay contact, generally speaking, you should add additional power supply to controlled DC motor. Or you can use one power supply for receiver and DC motor at the same time. The wiring method is as follow.
Connect DC motor to B&C terminals. And wire motor to positive and negative terminals of battery. Wire positive and negative terminals of receiver to battery.
Operation is very easy.
Press and hold button, turn on motor.
Release button, turn off motor.
2014/04/16
How to Remote Control 5 Lamps Individually
Question from Customer:
I am looking for 5 remote controls to control 5 individual lights in living room. Do you have any recommendations?


I am looking for 5 remote controls to control 5 individual lights in living room. Do you have any recommendations?

Answer:
We recommend the model of 1 channel 220V power output controller switch (S1X-AC220+2C-2), you can buy 5 sets.
It can control lights, motors, fans, electrically operated doors/locks/windows/blinds/cars or other appliances with AC 100~240V. You can turn on/off the receiver with transmitter (remote control) from any place within a reliable distance (about 100m); the wireless RF signal can pass through walls, floors and doors. With characteristics of direct power output, you don’t have to provide additional power to remote-controlled device since device can get power from receiver if receiver is charged.
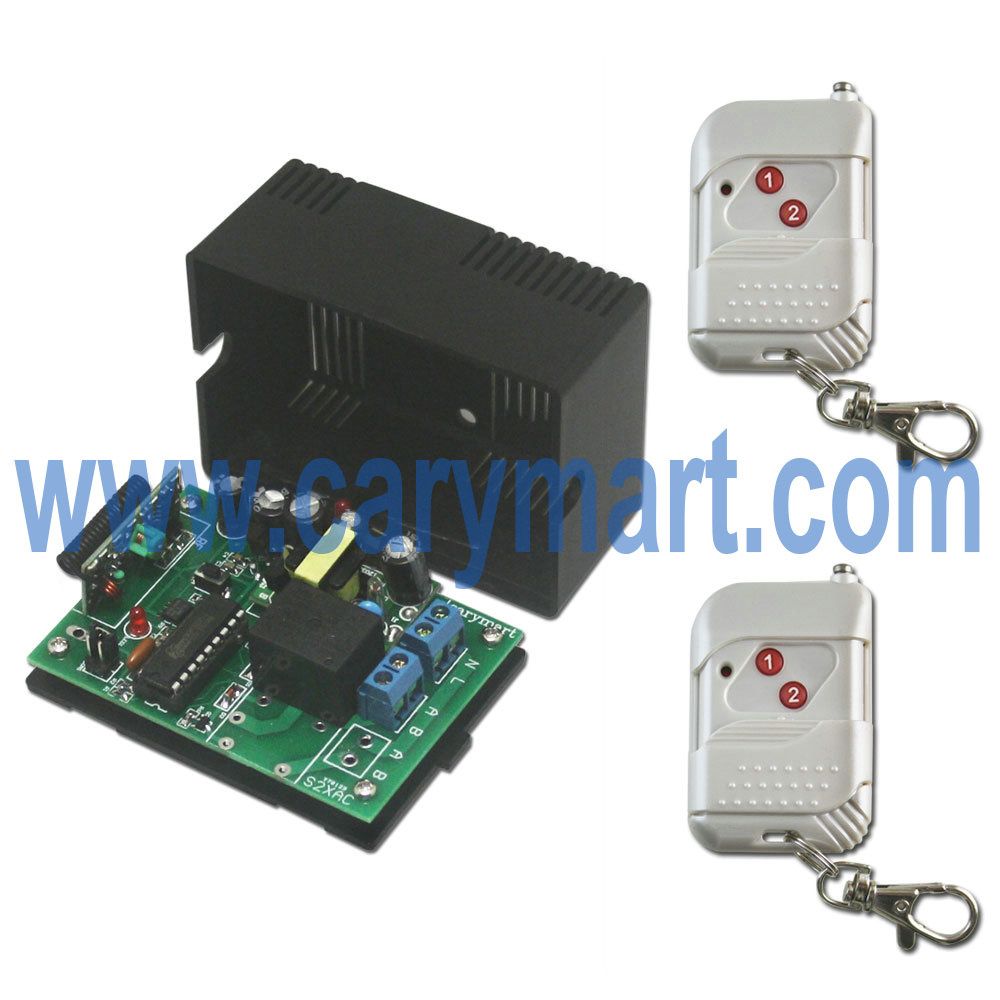
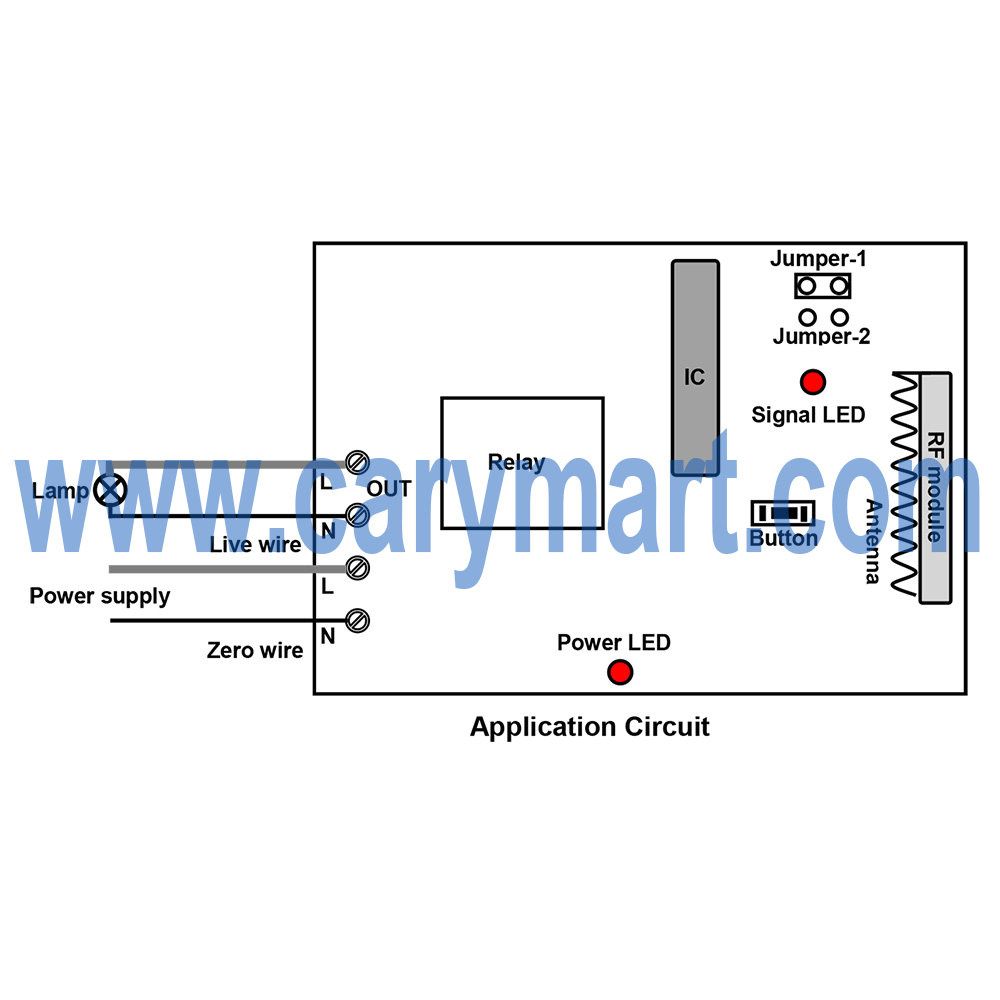
Wiring diagram is here. Wire light to L&N terminals of “OUT “terminal. Each light will wired to each receiver.
There are three working modes in it. They are toggle, momentary and latched modes. Here, you can choose latched because there are two buttons of transmitter.
Setting control mode Latched: Do not connect Jumper-1 and Jumper-2.
Press button 1: Turn on light.
Press button 2: Turn off light.
You can switch off/ on any light at your option.
2014/03/28
9V 999-Channel Calling Receiver Host for any calling
Wireless calling receiver host system adopts RF wireless and computer
communication technology. It can easily pair up to 999 wireless calling transmitters
and 1 manager remote controller. The receiver host uses advanced industrial
micro processor and high-sensitivity superheterodyne receiving technology which
make products very stable.
At the same time, the
wireless calling receiver host has advanced number speaker function and it can
clearly read the number, function, room number and so on. It is compatible for
different working mode, suitable for different places.

We offer four kinds of
power adaptors at your option.

Bracket from the back of
receiver can support receiver to stand on the table stablely. Or with fixed
holes on the back of receiver, you can use screws to install it on the wall.


It can pair up many kinds
of calling button to build up wireless calling system for waiter calling,
emergency calling and so on. The wireless calling system has millions of
different code which can be paired easily and freely.
And it is widely used in
restaurant, cafe, bar, tea shop, KTV, bank, office, factory, hotel, hospital health clubs, beauty salon, spa center and so on.
It includes many benefits, reducing staff costs, enhancing
the service experience and staff efficiency, increasing revenue.
2014/03/17
Wireless Standard Light Switch and RF Receiver for AC Lamp
Question from customer:
I want switch on and off my porch light. But I don’t want do some wiring from porch to inside of my house. I want switches which can be mounted or glued to a wall. I’d like to use standard light switch fixtures as well if possible.
Can you recommend me anything that solves this situation?
Answer:
We’d like recommend this 6VDC 1 button wireless calling button with adhesive-tape and 1 channel AC220V receiver (S1X-AC220). Calling button is a part of wireless calling system, here we pair it with a wireless RF receiver to make a remote control system.

Wireless calling button is the hi-tech electronic product which is integrated wireless communication and computer technology. Usually it pair with a wireless receiver host. However, ordinary RF receiver can work with it too as long as they paired.
It is widely applied to restaurants, coffee shops, karaoke rooms, discos, sauna rooms, beer houses, pubs, night clubs, bowling alleys, golf courses, video halls, hotels, hospitals, schools, chain stores ,shops…
Wireless calling button simply stick to wall or desk by double-adhesive tape on its back. You can stick to anywhere you want. There is no need wiring from switch to lamp. Your light can be wired to the receiver and do not need supply additional power to light because it can get power from receiver.
Here is the receiver wiring diagram.


Press the “CALL” button, turn on porch lamp.
Press the “CALL” button again, turn off porch lamp.
订阅:
博文 (Atom)